Intercompany
- IC Order Creation
- Shipping IC orders
- STR ORDERS
- How to create an STR POS Order?
- Intercompany Inventory confirmation
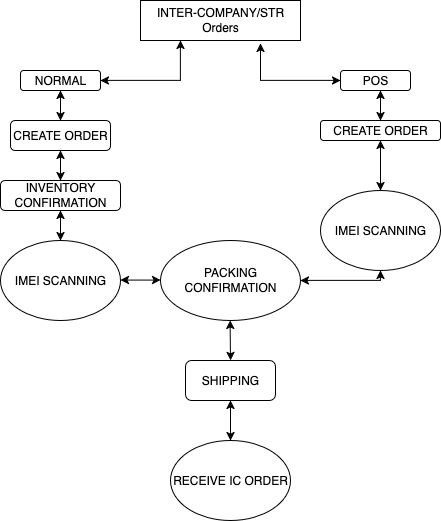
- INTERCOMPANY/ STR ORDERS FLOW
- Contextual Help
IC Order Creation
How to create and IC Normal Order?
IC Order creation is the process of recording a purchase between two warehouses within the same group of companies. This ensures accurate tracking, compliance, and smooth transfer of goods between the entity.
Steps in IC Order Creation
1. Enter Warehouse & Order Details
-
Select Source Warehouse.
-
Select Destination Subsidiary.
-
Select Destination Warehouse.
-
Enter Bank Account, Currency, and Delivery Terms.
-
Add any Special Instructions (optional).
2. Product Selection & Add to Cart
-
Browse or search for products.
-
Select:
-
Quantity
-
Variants (e.g., storage, model, etc.)
-
Unit Price
-
-
Add items to the Cart or click on Review Cart.
3. Cart Confirmation
-
Review all items in the cart.
-
Add Freight Charges and Handling Charges (if applicable).
4. Review Order
-
Confirm Billing Address and Shipping Address for both entities.
-
Verify Final Pricing, Taxes, and Delivery Charges.
-
Proceed to Place Order.
-
After review, the Intercompany Order is created and saved in Draft Orders.
-
The next step is Inventory Confirmation, where stock is validated and allocated before the order can move to shipping.
How to create a IC pos order?
IC POS Order creation is similar to a normal order but simplified for faster processing at the Point of Sale (POS). Instead of selecting products manually, the system allows scanning to capture items instantly after warehouse details are entered.
Steps in IC POS Order Creation
1. Enter Warehouse & Entity Details
-
Select Source Warehouse.
-
Select Destination Subsidiary.
-
Select Destination Warehouse.
-
Enter Bank Account, Currency, and Delivery Terms.
-
Add any Special Instructions (optional).
-
-
After order creation, scan IMEIs against the order.
-
Perform Packing Confirmation in OPS to finalize the product packaging.
- After packing confirmation in OPS the scanned quantity will be visible in the Cart.
-
2. Cart Confirmation
-
Review the scanned items:
-
Product details
-
Quantity
-
Pricing
-
-
Add Freight Charges and Handling Charges (if applicable).
3. Review Order
-
Confirm Billing Address and Shipping Address for both entities.
-
Verify Final Pricing, Taxes, and Delivery Charges.
-
Proceed to Place Order.
After the review, the IC POS Order is ready for Shipping.
Shipping IC orders
Steps in Shipping an IC Order
1. Open Shipping Confirmation
2. Review the Order
-
Click on Review to open the shipping details screen.
-
Verify the order information (warehouse, product, quantity, etc.).
3. Enter Shipping Details
-
Provide the required fields:
-
Shipping Carrier
-
Mode of Transportation.
-
AWB Number.
-
4. Save and confirm
-
After entering the shipping details, click Save.
The order will be completed only after the product is received at the destination warehouse.
STR ORDERS
How to create an STR Normal Order?
STR Order creation is the process of transferring stock between warehouses within the same company. This allows for efficient inventory management, ensures stock availability where required, and supports smooth operations across multiple warehouse locations.
Steps in STR Order Creation
1. Enter Warehouse & Order Details
-
Select Source Warehouse.
-
Select Destination Warehouse.
-
Enter Currency and Delivery Terms.
-
Add any Special Instructions (optional).
2. Product Selection & Add to Cart
-
Browse or search for products.
-
Select:
-
Quantity
-
Variants (e.g., storage, model, etc.)
-
Unit Price
-
-
Add items to the Cart or click on Review Cart.
3. Cart Confirmation
-
Review all items in the cart.
-
Add Freight Charges and Handling Charges (if applicable).
4. Review Order
-
Confirm Source and Destination Warehouse details.
-
Verify Final Quantities, Pricing, and Charges.
-
Proceed to Place Order.
-
After review, the STR Order is created and saved in Draft Orders.
-
The next step is Inventory Confirmation, where stock is validated and allocated before the order can move to shipping.
How to create an STR POS Order?
STR POS (Stock Transfer Request – Point of Sale) Order is designed for quick stock transfers at POS level. It combines the simplicity of POS order creation with STR stock allocation.
Steps in STR POS Order Creation
1. Enter Warehouse
-
Select Source Warehouse
-
Select Destination Warehouse
-
Select Forwarder
-
Enter Bank Account, Currency, and Delivery Terms
-
Add any Special Instructions (optional)
-
-
- After submitting, a draft order is created.
-
After order creation, scan IMEIs against the order in OPS.
-
Perform Packing Confirmation in OPS to finalize the product packaging.
- After packing confirmation in OPS the scanned quantity will be visible in the Cart.
-
2. Cart Confirmation
-
Review scanned/allocated items:
-
Product Details
-
Quantity
-
Pricing
-
-
Add Freight Charges and Handling Charges (if applicable).
3. Review & Confirm Order
-
Verify Billing Address and Shipping Address.
-
Validate Final Pricing, Taxes, and Delivery Charges.
-
Confirm and place the order.
After the review, the STR POS Order is ready for Shipping.
Intercompany Inventory confirmation
The Inventory Confirmation step ensures that the requested stock is available before proceeding with the transfer. This step is mandatory for Normal Intercompany Orders but is automatically handled for POS Orders.
Steps for Normal Intercompany Order
-
Go to Intercompany Module.
-
Click on STR / IC Order.
-
Open Inventory Confirmation → Pending Orders.
-
Select the order.
-
Click Review.
-
If the quantity is available, click Accept; else, click Reject.
-
After confirmation, proceed to IMEI Scanning.
Note: Inventory Confirmation is only required for Normal Orders. For POS Orders, this step is automated.
INTERCOMPANY/ STR ORDERS FLOW
Contextual Help
COUNTRY OF ORGIN (COO)
Country of Origin (COO) refers to the country where a product is manufactured, produced, or assembled. It indicates where the goods originally come from.
How to Update COO for an Order
-
Go to STR or IC All Orders.
-
Select the required order.
-
Click on the Action button (with the location icon).
-
To update the COO (Country of Origin):
-
Use Bulk Select and choose the same country for all products, if the COO is identical.
-
Otherwise, select the country individually for each product.
-
-
Click Submit to save the changes.
The COO will be successfully updated.
Note: COO can only be updated after the packing confirmation is completed.
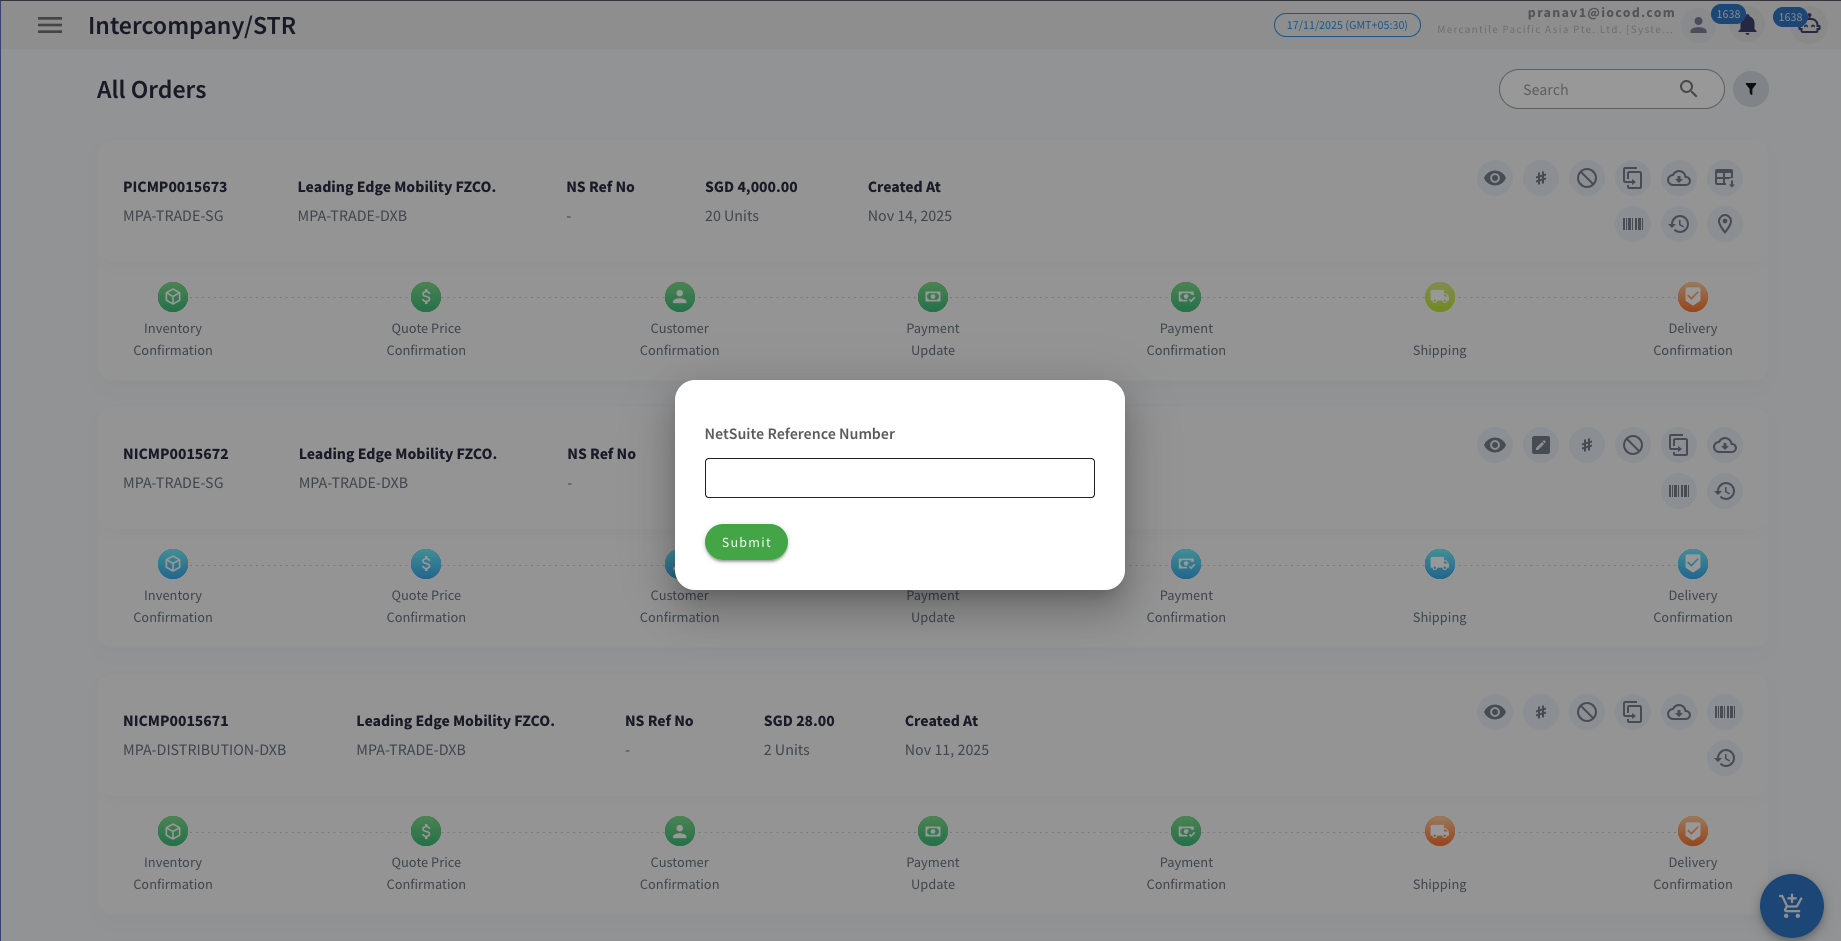
Update Net Suite
-
Click on the # action button.
-
Enter the NetSuite number.
-
Click Submit.

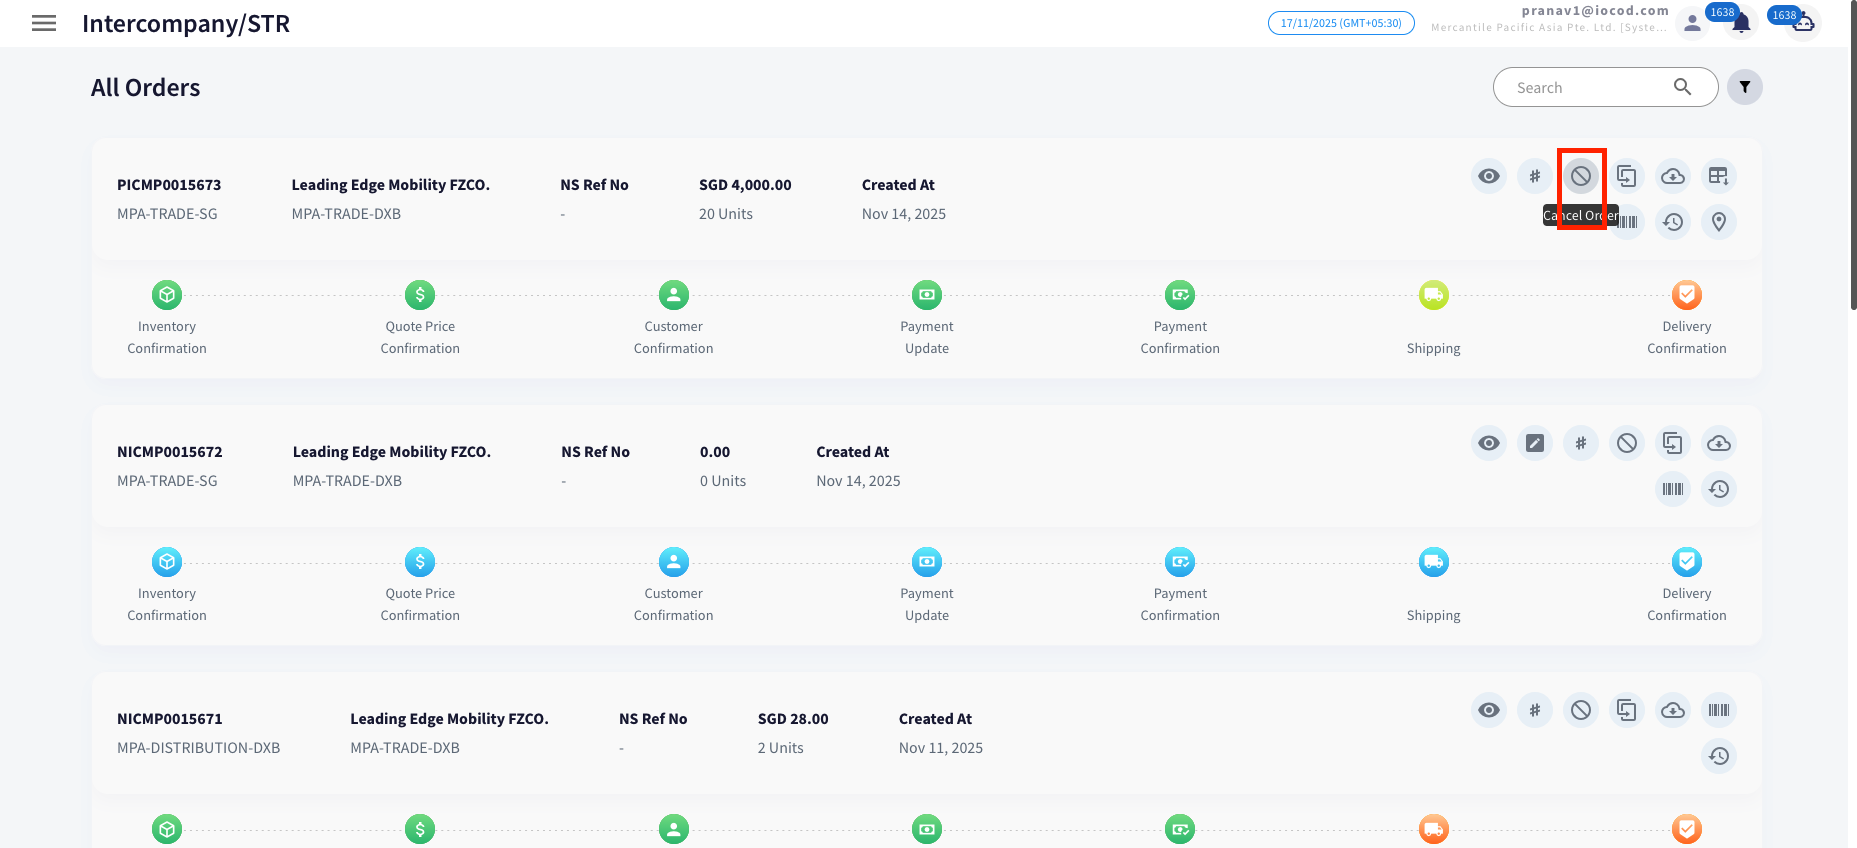
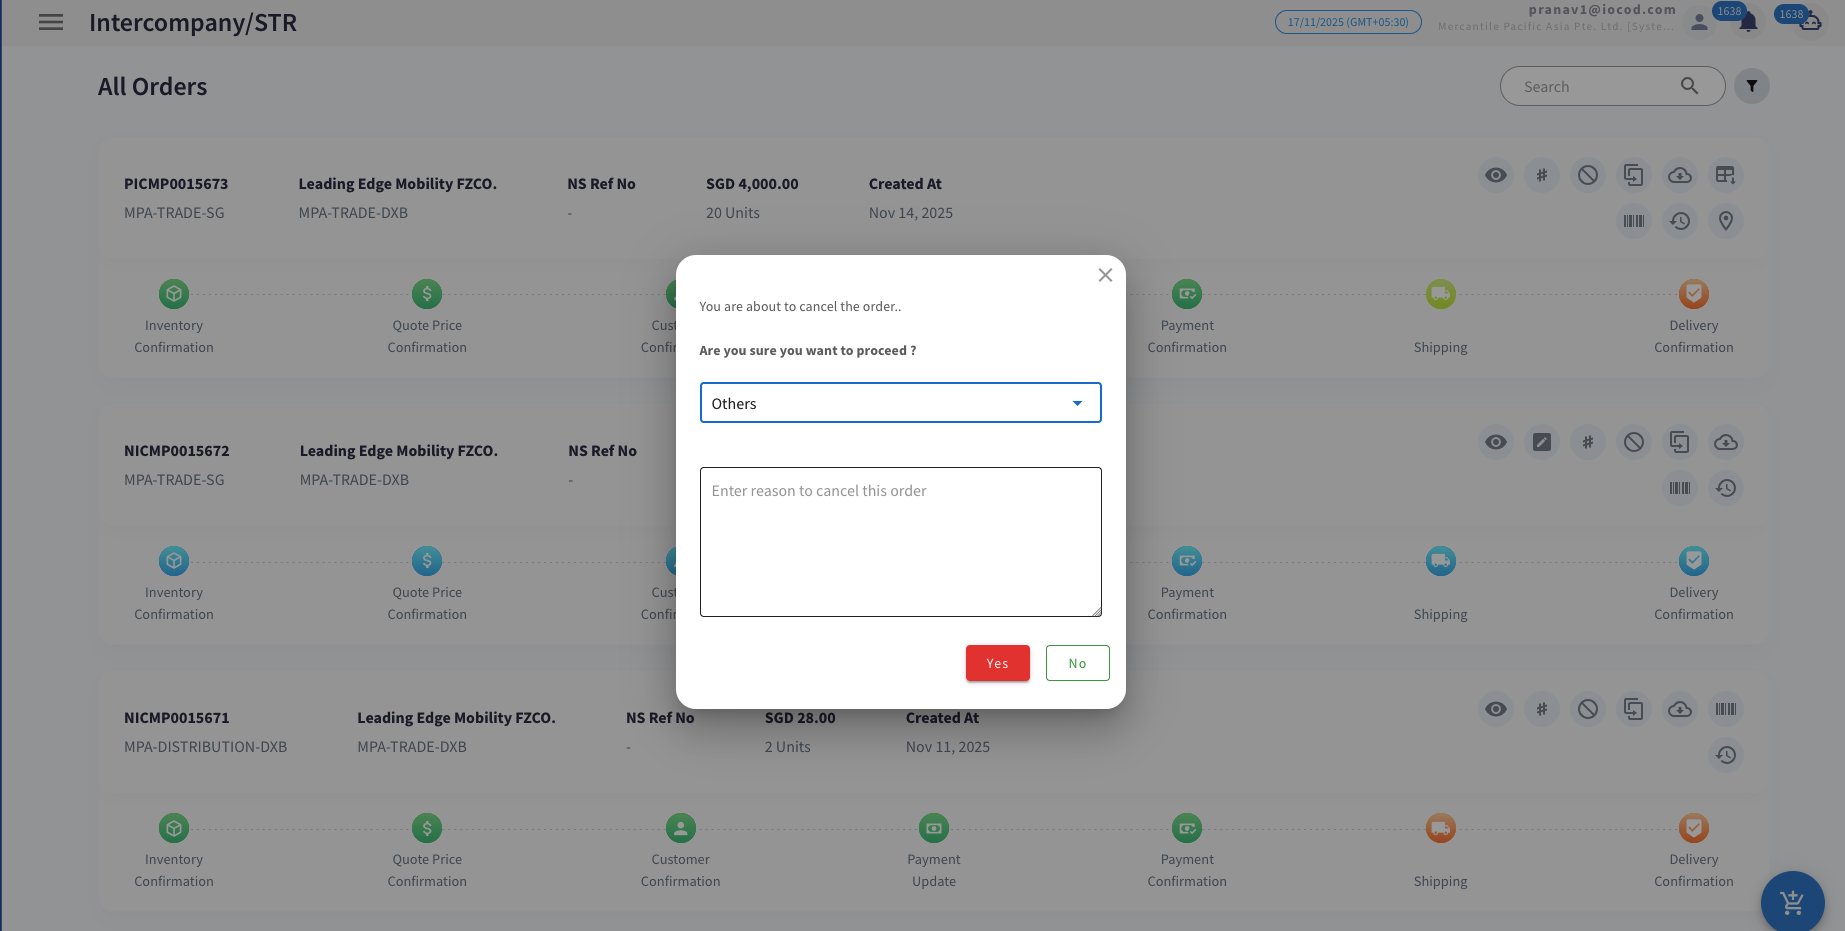
Cancel Order
-
Click on the Cancel button (as shown in the image).
-
Select the reason for cancellation from the list.
-
If the reason is not listed, choose Other and enter the reason manually.
-
Click on Yes to confirm the cancellation.

Download Invoice
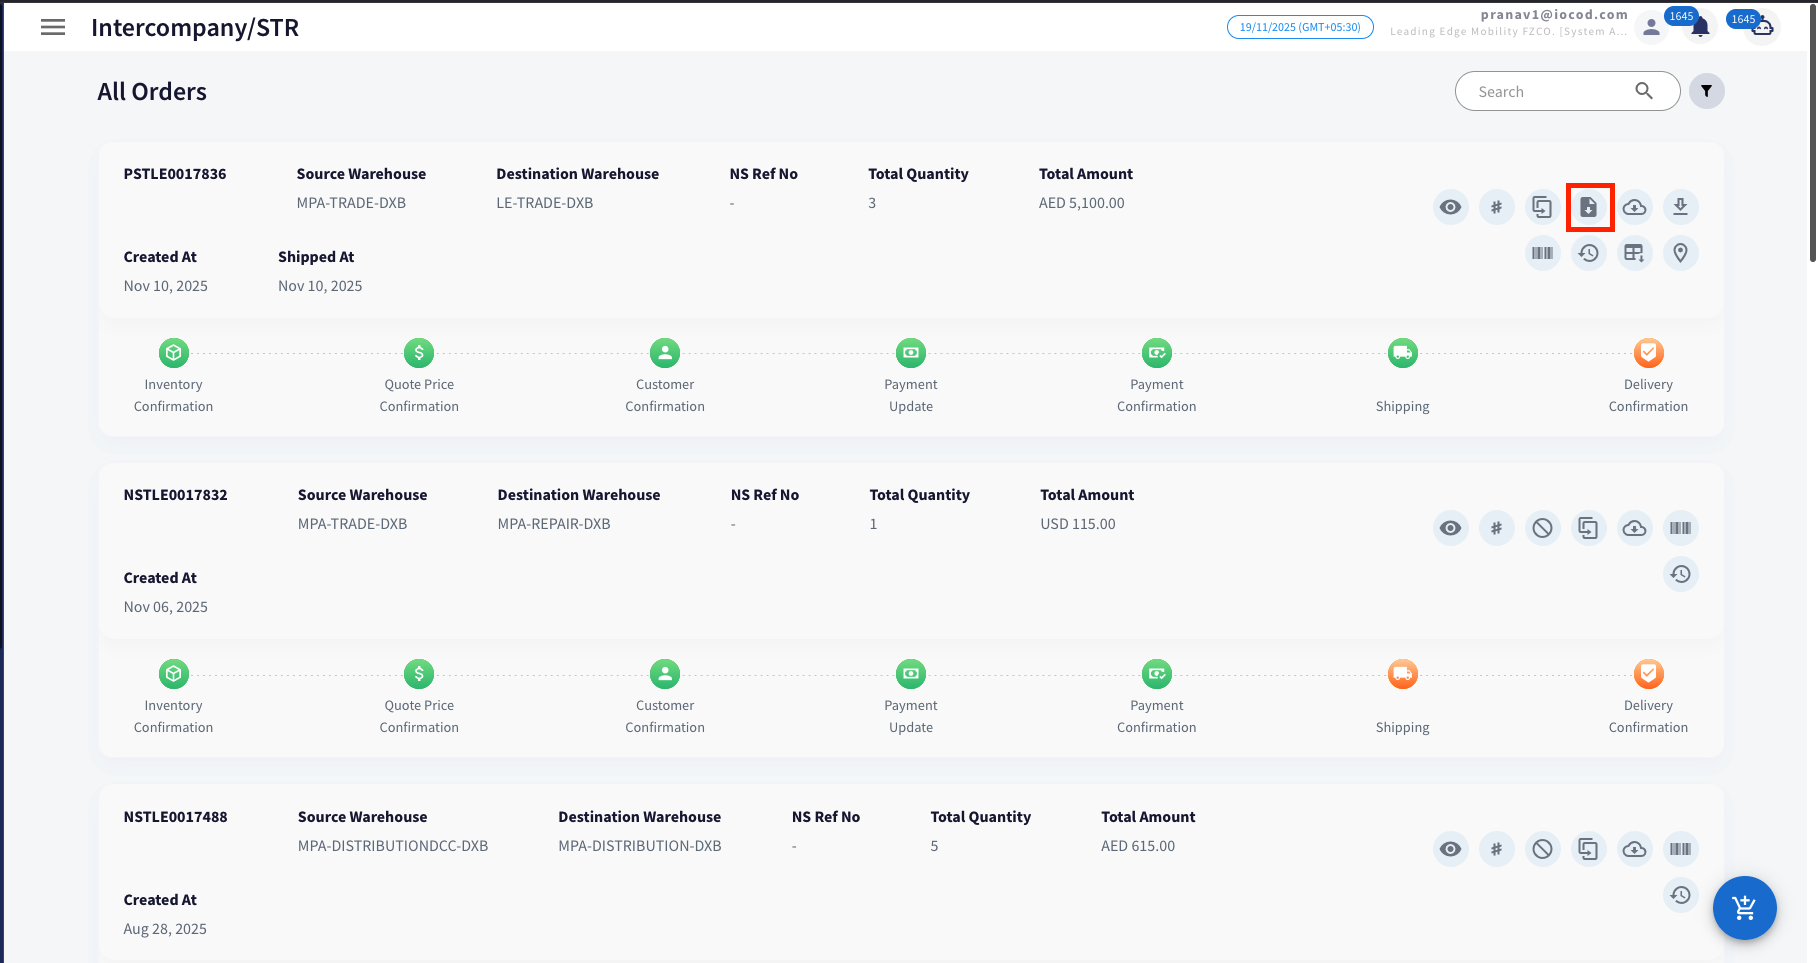
Steps to Download Invoice:
-
Click on the Download Invoice button (as shown in the image).
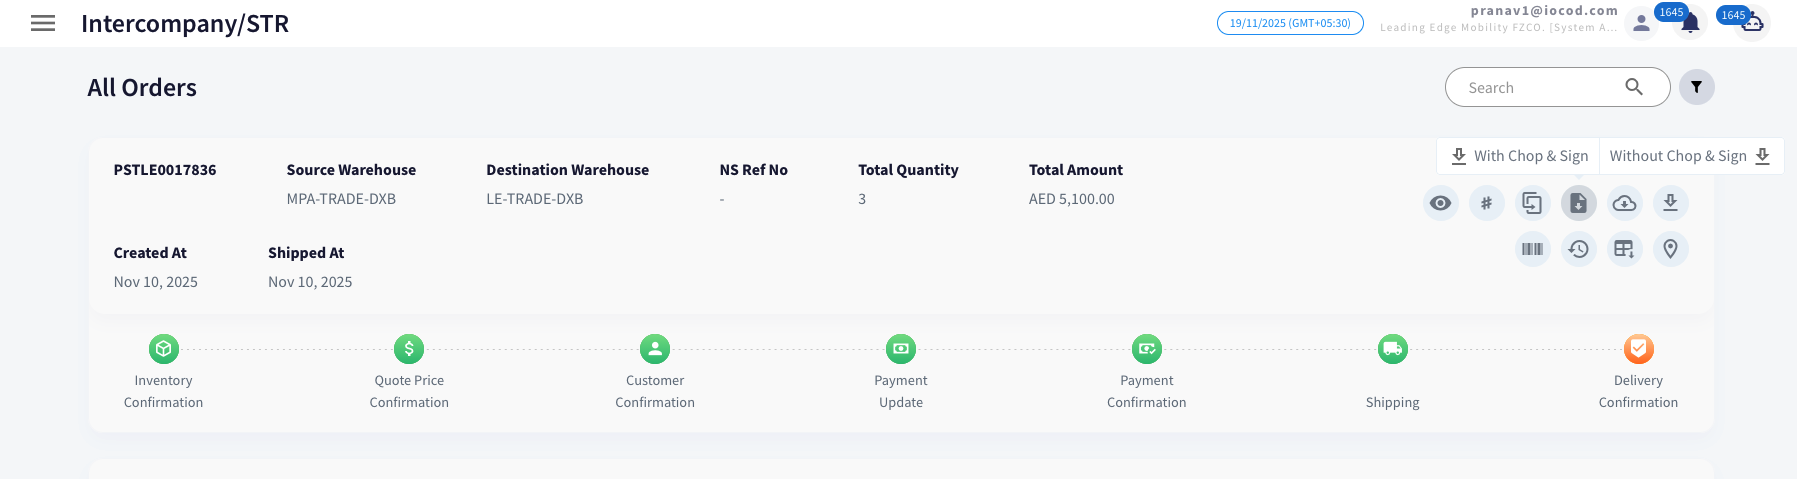
-
Select either With Chop and Sign or Without Chop and Sign as required.
-
The invoice will be downloaded automatically in PDF format.
Download PI
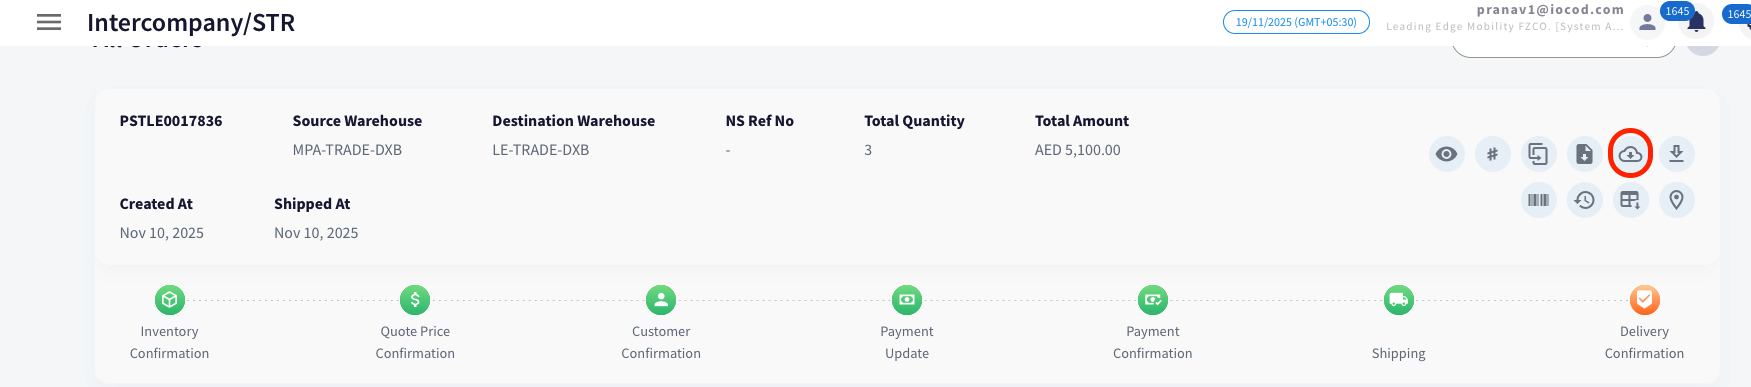
Steps to Download Invoice:
-
Click on the Download PI button (as shown in the image).
- The invoice will be downloaded automatically in PDF format.
Download DO
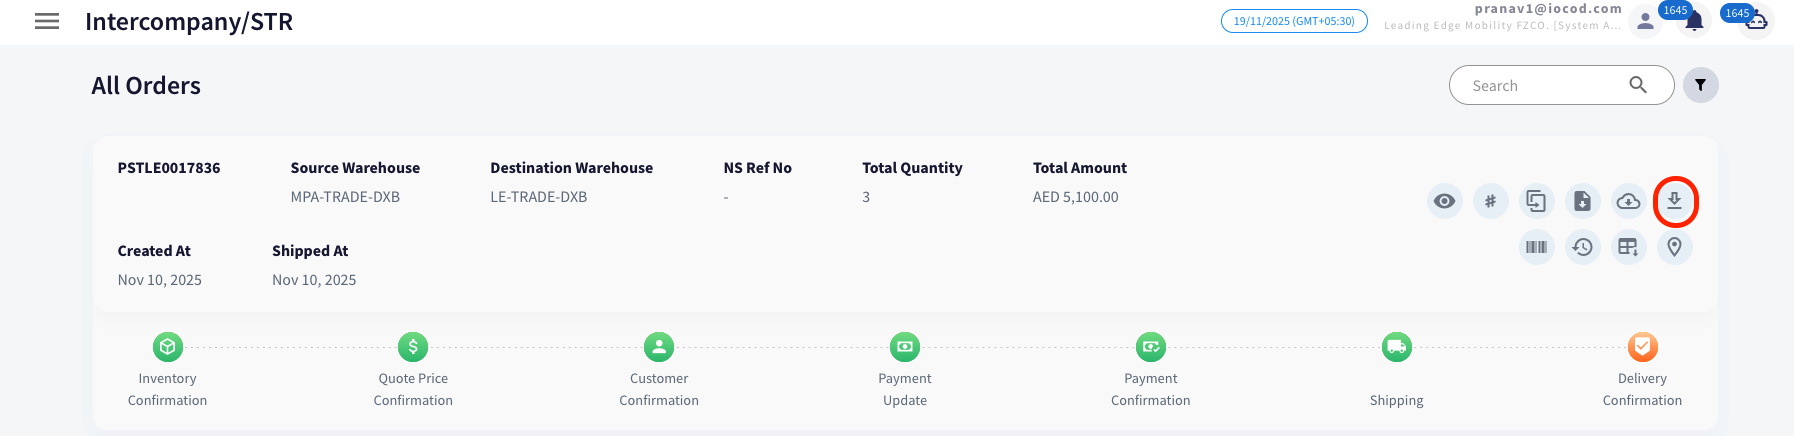
Steps to Download Invoice:
-
Click on the Download DO button (as shown in the image).
-
Select either With Chop and Sign or Without Chop and Sign as required.
-
The invoice will be downloaded automatically in PDF format.